
Mini disc brake caliper cleanup
Click on the images to enlarge
On the way home recently the Mini started to make a metallic grinding noise which was pretty disturbing I can tell you. As I pulled into my driveway I had visions of collapsed CV's and god knows what going on in my front right wheel arch.
I parked the car out of gear and with no handbrake and manually pushed it back and forth while listening to the grinding metal on metal sound.
No, not good at all.
I parked the car as it was late opting to take a look at it in the morning. The next day I removed the road wheel and found that the pads were binding onto the disc when wet. I removed the split pins, pad shield, and pads themselves and spun the disc freely, the grinding sound was still there.
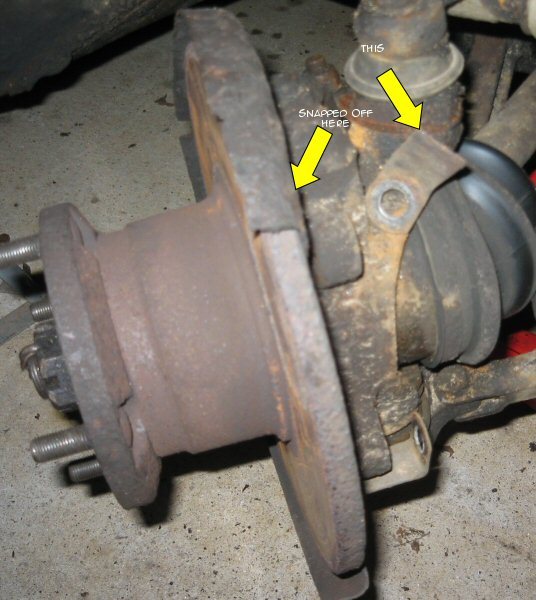
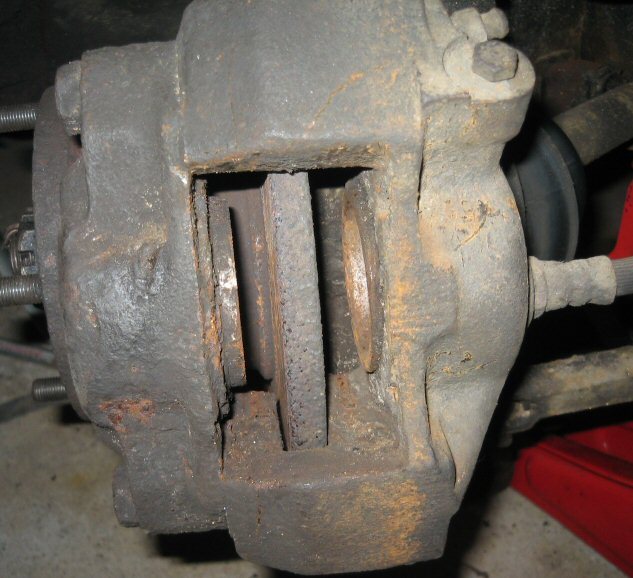
It wasn't until I removed the caliper that I discovered that the brake disc 'dust cover' had a broken flange resulting in the metal dust cover rubbing against the disc which was producing the noise I heard.
While the caliper was off I decided to give it a bit of a clean. The pistons were covered in grime and the outer one was jammed and would not budge.
To get the pistons to come out you slowly depress the brake pedal to get the inner pedal out, then secure it and press the pedal again to get the outer piston to come out. Easier said than done. I tried using a big plastic tie to restrict the inner piston but that proved useless so I resorted to a clamp.
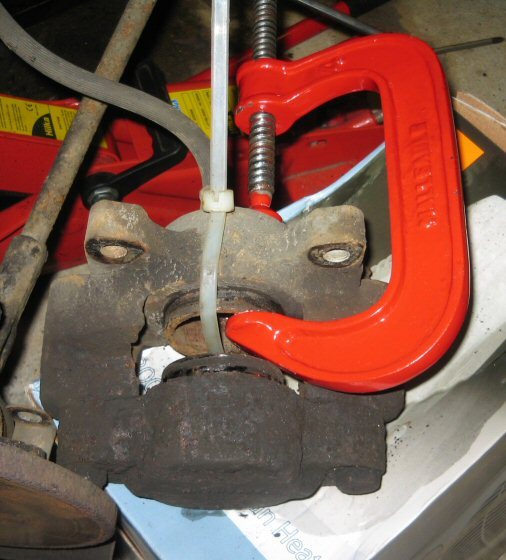
With both pistons slightly out I cleaned them up. When it comes to pushing them back in so you can get the pads back in, you must first remove the cap off of the brake fluid reservoir under the bonnet, as the level will rise. Then using the clamp I pushed in each piston by working left, right, turn the caliper over, then left, right, turn the caliper back over (don't twist the pipe) and repeat until it was pushed back in. Repeat for the other piston.
I had to undo the steering rack ball joint nut to get the dust cover off. Once off I cleaned up the edge of the metal flange that had broken off and the point where it had snapped off on the dust cover. I then had my first go at unsupervised welding and I'm happy to say that I found it relatively easy.

What wasn't easy was separating the two halves of the dust cover. The bolts were shot and after unsuccessfully trying to remove them I just angle grinded them off. This meant I had to source some replacement bolts before refitting.

Putting it all back together was the easy part. Once everything was back in place I took the car for a short drive to the brakes. I'm glad to report that there was no longer any metallic grating noises coming from the wheel arch any more.
I am unhappy to report however that I hit some bricks with one of my front alloy wheels and broke the Revolution twin-flag centre cap. It turns out that it was just plastic! They may look good but I'm starting to think that the quality of Revolution wheels aint what I thought they would be like.
Did you enjoy this article or find the information useful? Help keep Dave and his articles online by keeping him fed with coffee by clicking the link below. Cheers!

Next page - How to fit Group 2 wheel arches to your Mini
Previous page - Before and after
Back to the Mini Project Main Menu

This website uses cookies. Click here to learn more about how and why we use cookies.