
Mini suspension
Fitting an adjustable suspension
Click on the images to enlarge
Note: I purchased my mini suspension system from Mini Sport. It consisted of Adjusta Ride Hi-Lo mini suspension front and rear adjustable trumpet sets with bars for rear, Moulton rubber cones, KYB gas-adjustable dampers, and a compression tool for the front suspension.
The compression tool that is sold by Mini Sport at the time of writing (December 2007) is not fit for purpose and can be dangerous to use. After calling them on the telephone, they admitted that the tool did not work on all Mini's and that their own engineers have experienced problems (yet they still sell it). Their engineer's solution was to cut a quarter inch from the jacket in order to make it usable. I opted instead to return the tool and obtain a refund. This proved to be a painful process and one where I experienced very bad customer service. Suffice to say, I do not recommend Mini Sport and will not be purchasing anything from them again.
I had originally replaced the rear mini suspension some time ago and I had been putting off replacing the front untill absolutely necessary. That time came when I purchased a set of 12" Revolution wheels with 12x165x60 Falken tyres. When on the car, the front wheels rubbed against the body on full lock. I contacted the online store that had sold me the wheel and tyre package and they told me to check my suspension as it may have dropped. It had.
Replacing the front suspension was a bitch of a job and I'm not holding back when I say that. It made replacing the rear subframe seem like a walk in the park and that's saying something.
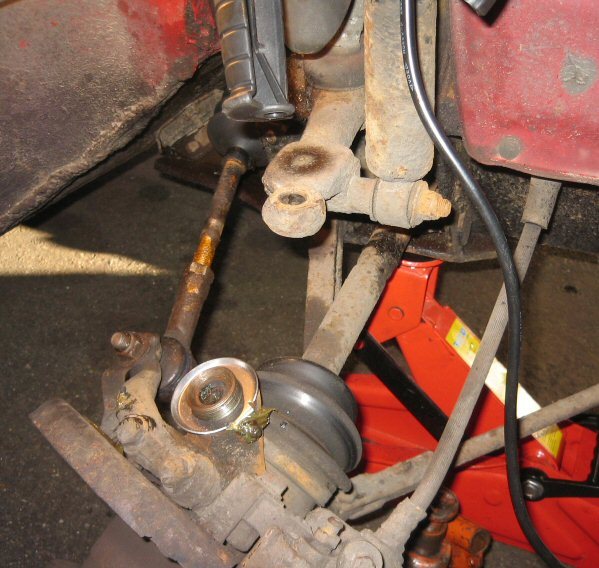
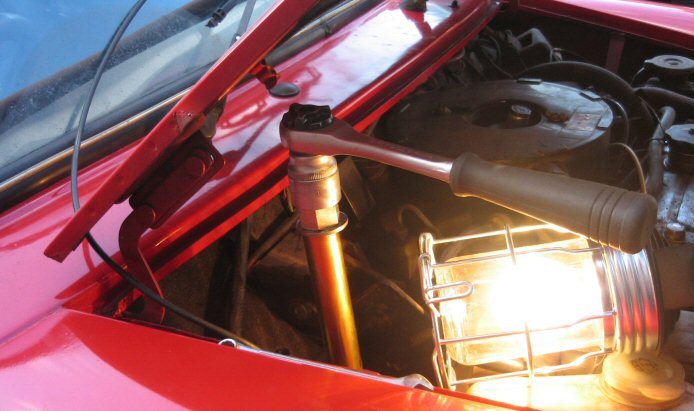
Removing the front suspension required removing the road wheels and disconnecting the top ball-joint (I overhauled mine as it was worn). Then using the compression tool you had to wind up (compress) the rubber cone located in the top of each tower of the front subframe, located near each wheel arch.
This was easier said than done. It took ages to wind up the cone. Then you have to remove the trumpet and knuckle joint before releasing (un-winding) the rubber cone. After that, remove the upper suspension arm and damper.
The upper suspension arm was a pain in the backside to remove. All the nuts were well rusted and were hard to get to (tip: Remove the front grill and use a long socket wrench extension bar).
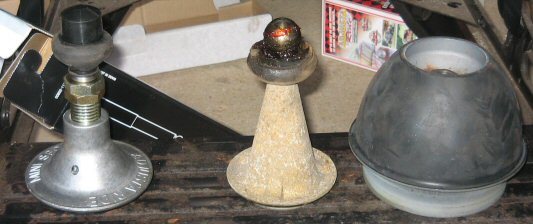
With everything off, check parts for wear and replace anything that has had it. On my car both front rubber cones had had it. They were almost 2" shorter than their replacements! Plus the dampers were shot and whatever oil was in them had leaked out long ago. The suspension arm rubber seals were worn too, but luckily they are the same circular rubber oil seals that fit the rear radius arms so I used some spares I had lying around.

Refitting the front suspension was almost as bad (if not worse) than removing it. I learned the hard way (so take note!) that you have to put the upper suspension arm on last after you have fitted the new rubber cone and trumpet (or Hi-Lo) in place.
In this order: Insert the new rubber cone (easy with no suspension arm in place) and wind it up (compress it) with the compression tool. Fit the trumpet or Hi-Lo (I used Adjusta Ride trumpets) and knuckle joint next. Slide in the upper suspension arm and fit the knuckle joint into the hole (make sure you have a nylon cup). Then slide the suspension arm bar through the side of the subframe tower, through the suspension arm, and out the other end. Make sure all rubber seals, washers, and bolts are in place and tighten up the suspension arm.

Next, fit the damper to the upper suspension arm damper bar, and the upper suspension mount. I used a bottle jack and big spanner to lift the suspension arm to fit the damper but I'm not recommending you try that. I used the same technique when fitting the top ball-joint back onto the upper suspension arm.
With everything in place, tighten everything up and fit rebound rubbers if you have any. Mine were shot so I had new ones (Note: Remove them if you have them when fitting the new suspension in order to allow more movement of the upper suspension arm).

Finally, release the rubber cone slowly by un-winding the compression tool. Replace the bolt and rubber bushes into the holes in each side of your bulkhead that the compression tool went into.
Finally, a few things worth noting about this job:
- Buy a decent compression tool
- Grease the inside of the rubber cone thread before compressing and to avoid stripping the thread
- Remove the rebound rubbers to allow more of an angle to get the knuckle-joint into the suspension arm
- Make sure that your adjustable suspension trumpet is wound down at the lowest setting before installing
- Grease all grease nipples when done
- Get a friend or relative to help you (thanks Dad)
With the new front suspension on, put your road wheels back on and lower the car. Take it for a short drive down the road and back and then park it up. With mine, the car was pointing up in the air at the front, which is not good as your lights will blind oncoming drivers (plus it's an MOT failure).
I wound up my rear suspension and took measurements of the distance between all 4 wheels and the wheel arches. This is so I can monitor the front suspension as it begins to settle. From experience, the adjustable suspension will drop half an inch in two weeks, and another inch or so in a further two months. After that, you can wind up your suspension to suit your taste.
It's the first time that I have ever had to wind up a cars rear suspension in order to align the headlights!
Update: It's been 3 weeks since I installed my new mini suspension and I'm loving it. It has settled a bit more and it's firm on fast corners (it leaned a lot after it was first installed) and it's soooooo comfortable! It doesn't feel like a Mini suspension any more. Ok, so my original front suspension was pretty much shot, but this new suspension gives a softer smoother ride. You hardly feel potholes, raised ironworks or other uneven road surfaces any more. This is a must-have upgrade for any Mini driver.
Did you enjoy this article or find the information useful? Help keep Dave and his articles online by keeping him fed with coffee by clicking the link below. Cheers!

Next page - Solving blowing exhaust and tie bar rod problems
Previous page - Steering rack service
Back to the Mini Project Main Menu

This website uses cookies. Click here to learn more about how and why we use cookies.